| Chain Mail for beginners |
C. Arilius Genialis |
 |
| Choices, choices! Once you have chosen which re-enactment group to join (for me an easy decision), there remain a bewildering number of choices to be made. For Roman military re-enactors, some of the more obvious What type of soldier, Legionary, Auxiliary or Archer? Not too difficult this, provided you don't have an obsession with water-wings made from inflated bladders or with combing through cornfields for lost arrows choices are: . What type of helmet? Well, the Imperial Gallics really do look the part, but the Coolus is easier and cheaper to get hold of. Pompeii or Mainz pattern sword? Or something more obscure? And finally, the really big ones. Lorica segmentata or lorica hamata? And if the latter, do you buy it or make it yourself? After a period of dithering, the decision for me came down to choosing between the cost and potentially long wait for segmentata (though it looks stunning) or taking the Taurus by the horns and making my own chain mail. I plumped for the latter option, which is how I came to write this article. |
|
Always seek advice from within the unit on where to obtain materials. Most or all of what you require can be bought at very reasonable prices from within the unit, saving you worry as to whether you've got the right stuff and time finding suitable suppliers.
Square section links These are easy, but also the most mind-numbingly boring part of the job! Take your M4 spring washer, grip it firmly on one side with one pair of pliers, then use the other pair of pliers to bend the washer flat. You will need to "over-bend " the washer as it will spring back when you let go (that's why they're called spring washers). With a bit of practice you will be able to bend it just right so that it is nice and flat when you let go. |
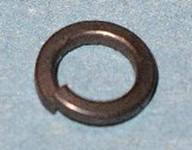 Washer before bending |
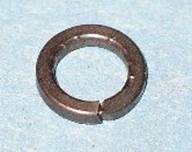 Washer after bending |
| If you are making auxiliary mail, you will
do something similar but starting with an open round section link
instead of an M4 spring washer. Round section links These are a bit trickier! The first stage is to form the welding rod into something that looks like a tightly coiled spring. Then this is stretched out and cut into individual turns, each of which forms a link. Firstly, fix the 4mm bar firmly into the chuck of your electric drill. Then uncoil about 3m of the welding rod, making sure that it won't get caught up on anything as you coil it onto the bar. Secure the end of the welding rod into the chuck of the drill (I poked it into the gap between the jaws of the chuck then bent it over so it is ready to be coiled round the bar). Wear suitable protective gear (thick gloves and eye protection as a minimum) for the next bit as the rod can twang around quite alarmingly! You will also need to have your cutters to hand before proceeding. Keeping the free welding rod in place with one hand, operate the electric drill at the slowest possible speed to coil the rod onto the bar. Keep the turns tightly packed, i.e. each turn touches the adjacent turns. Stop when the coil has nearly reached the end of the bar, then cut the free end of the rod about an inch from the bar. Be very careful doing this as the tension in the coil makes it unwind a couple of turns as soon as it is no longer restrained by the uncoiled welding rod. So keep your hands clear and be ready for sparks to fly! You should now have a coil of the welding rod 4mm in diameter and 1.2mm thick. NB it obviously makes sense to make up a number of coils at one sitting, as this takes quite a bit of setting up. |
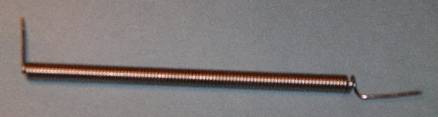 Made up coil prior to stretching and cutting |
| When you are ready to make some links, first make
sure you are on your own or you have issued ear defenders to your
partner. Then grab hold of the two ends of your coil with your pliers
and stretch it out until there is a decent gap between adjacent
turns (you will need to get the closed links through this gap when
making the mail). Trial and error is the only way to be sure you're
getting this right. Finally, use the cutters to cut the rod into individual links. It is important to cut each link with the cutters at the same angle and with the cuts lined up, otherwise you might not be able to get the links to close (if the ends overlap) or they may end up with a gap in them. Again, trial and error (and a lot of practice!) is the only way to get this right. |
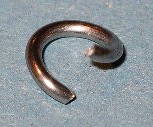 Round link after stretching and cutting |
| Making the mail There are various ways of making the mail. All typically involve making up smallish pieces and then joining them together. I have set out the method I followed (courtesy of Bvt) though others have different preferences. Stage 1 Start off with one round link. Hook four square links onto it then use your pliers to close the round link. Repeat this ten times so that you have ten 'molecules'. Now take one 'molecule' and arrange it as shown below. Pretend this is Mickey Mouse with the upper pair being his ears and the lower pair being his cheeks. |
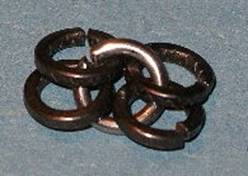 One 'molecule' |
| Take another round link and loop it through Mickey's ears from below. Now take another molecule to make a second Mickey Mouse, and hook the second Mickey's cheeks onto the round link. The two molecules should look like this |
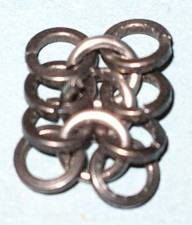 Two molecules waiting to be joined |
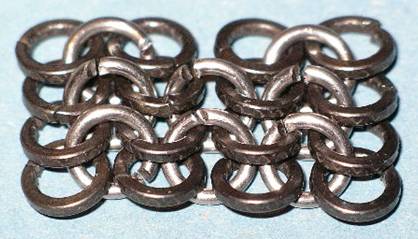
| Finally, bend the round link closed. The two molecules are now joined and should look like this |
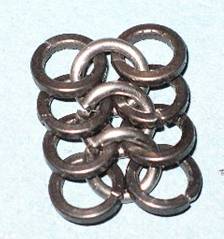 Two molecules joined together |
|
Add eight more molecules in the same way
end to end. Once all ten molecules have been joined you will have
a strip of chain mail, with two rows of square links (20 in each
row) and a single row of round links down the middle (19 links).
Once you've made up your first long strip
you can then spread it out (again without stretching it too 'tight')
and double check that you've worked everything out correctly.
Remember the old carpenter's saying, "Measure twice, cut once"! |
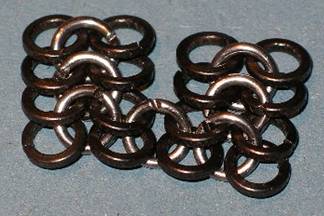 Now add a second round link to join up the second and third links of each strip. It should now look something like this. |
||
 Continue until the two strips are joined up along their entire length. |
| Now you can think about joining the two ends
of the strips together to form a round 'cylinder'. This cylinder
will go around your body (poor thing). This is achieved in exactly
the same way that you would join two 'molecules' together. I joined
each strip up into a cylinder as I added it to the main body of
the shirt, rather than make up a big flat sheet and then joining
all the ends of the strips together. This was principally so I didn't
get confused as to which way round the whole thing was meant to
go! Stage 4 You basically keep going in the above style until the cylinder is long enough (i.e. you have joined up enough strips side by side) to reach from your groin to under your arms. Once you have done this you need to start thinking about leaving arm holes. Essentially you now start make up strips that are long enough just to reach from one armhole to the other. You may think that means half as long as the strips you were making before, but you would be wrong! A Roman legionary is nothing if not fashion conscious, and therefore requires a tailored mail shirt. So, the strips across the front of the mail shirt actually need to be a bit shorter than the ones that go across the back. I was told to halve the total number of (square) links in a strip, then take 4 links off for the front and add four links on for the back. So, in my case, there are 151 square links on the front of my shirt between the armholes, and 159 square links on the back between armholes. Stage 5 Now it's time to put together the finishing touches! Firstly, as you continue adding rows to the front and back, there will come a time when you should split each row into left and right halves, and then shorten each row as you continue. This will give a 'v' shape to the front and back to make a sensible hole for your head to go through. I basically made this up as I went along, and recommend you do the same (by this stage you will be pretty confident in your mail making techniques so have the confidence to judge what to do here!). Of course, you can always take sly glances at other soldier's shirts to get an idea of what to do. Secondly, when you get to the top, you will discover that the rows on the front of the shirt are going in a different direction to the rows on the back (when you've spent some time making up the mail this will make sense to you). I solved this by using two rows of round links to form the 'seam' across the tops of the shoulders. The finishing touch is to sew some strips of leather around the neck hole to avoid the links scratching your delicate skin. You are now the proud owner of a mail shirt! Stage 6 If you are anything like me, now is the time to give the whole thing a rest. You have a shirt that you can wear to shows, no-one will send you home for not having shoulder doubling. However, after a while, the thought that you really should have that doubling will get too strong. So, pick up your pliers for the final onslaught! Basically, I suggest you have a look at how other soldier's doubling works and decide on the best approach to making yours. I made mine as a flat sheet (that now sits across the back of my shoulders) and then adding strips on the left and right that come across the top and are secured at the front by the clasps. The very front section is narrowed even further to give a sort of L section. Mine is secured part way down the back of the main shirt with the larger links used (see the list of ingredients above) for extra strength. I leave it to others with more knowledge to say whether this is more authentic than the arrangement where it is joined at the back of the neck and then extends in both directions (I can't describe this any better, but if you want to see what I mean look at Pacatianus's mail). So, now you really are the proud owner of a fully functioning mail shirt! Genialis |