|
| |
Soft kit
|

Maximio (Peter Noons) |
| |
|
| |
This is intended to be a basic guide to getting your essential
kit together i.e. Tunicae, Paenula or Sagum (Cloaks) and lacing
up your Caligae (boots).
General point : The best place to buy material is at a reenactors
fair as you will then be able to check if the material is authentic
for the period (there probably never were any callico legionaries).
The price will also probably be less than you would pay in the
high street, and the stall holders are usually a fairly good judge
of the amount of material you will need.
|
| |
The Tunica
|
Basic shape of tunica with sleeves.
Materials : wool, linen
Colours : Blue if legionarii, green if auxilia
Hamians may use cotton
The design of the under tunic is the same except that you
can do without the sleeves. Use a linen material for the under tunic.
|
| |
The Tunicae is the basic uniform
of the soldier, for the legionary (and to a certain extent the
Auxilia), it is a very easy piece of kit to make your self even
with minimal sewing skills.
In its simplest form it is a long rectangle
of appropriately coloured wool stitched up the sides and top with
two slits left at the upper sides for the arms to come through
and one in the top edge for the head. It should be long enough
to fall to mid calf and wide enough to reach either elbow, the
length is then hitched up over a thin belt or leather thong tied
around the waist.
Bear in mind that Singer had not invented his sewing
machine during the Roman period so all work should be hand stitched
(Blanket stitch was a late Roman development so a simple stitch
should be used).
Under tunics made from linen or wool would
be of the rectangular pattern. Bear in mind that wool under tunicae
though accurate will probably be a bit too itchy for our modern
21stC delicate skin.
|
| |
The Sagum.
The cloak came in two versions - the Sagum is a simple
square of cloth which would be pinned at the right shoulder with
a brooch. The normal dimension of this would be 1.5 to 1.7 metres.
As most suppliers now sell wool cloth in widths of 1.5 metres
that rather sorts the dimension out for you.n out for you.
Top
|
| |
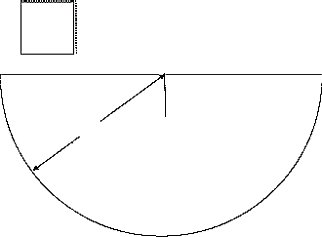
The Paenula
The Paenula needs some manufacturing
to take place but again is not too difficult. It is a large semi
circle which then has a square hood stitched onto it.
The radius of the semi circle is 1.5 metres
so to make this you will need to buy a length of 3 metres. To
get the semi circle mark the centre of one of the long edges and
hold one end of a piece of string to this point. Measure out the
string to 1.5m and tie a piece of chalk to the other end. Hey
Presto a home made large compass. Mark out the semi circle and
cut it out.
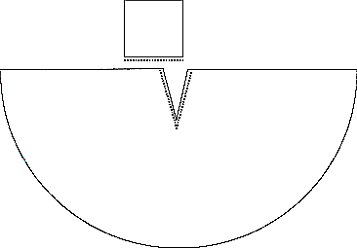
You should have enough left over material to cut out two 30cm
squares to make the hood with. Stitch two edges together as in
the diagram. This will form the back and the top of the hood.
Then you need to cut a slit 20 cm long in from
the centre of the long straight edge. Stitch one of the loose
edges of the hood to each side of this slit. NB the two edges
you have already sewn together of the hood should form the back
and the top so make sure that the back is at the point of the
V in the slit (see diagram).
This will leave about 10cm of the hood over the edge of the semi
circle. You can then stitch the protruding edge to each side of
the semi circle as this will pull the hood forward over your shoulders
when wearing it.
You can then either fasten the cloak at the
throat with a large brooch or attach it together with three toggles
which would have fastened across your chest. These can be carved
from wood (not too hard especially if you were a boy scout), or
made from horn which can be bought from trader's fares.
|
 |
| |
 |
| |
 |
A variation on this form of cloak was the circular
pattern whereby you would need to make two semi circular lengths
which would be stitched together about 120 cm along one of the straight
edges. The hood is made as above and then attached with the rear
seam beginning where the two halves of the cloak have been joined.
Fastening is as for the semi circular cloak above. This will create
a large but very warm cloak, perfect for very cold weather.
Top
|
| |
Use
pigs fat or camping waterproofing to weather proof the cape. |
| |
Bracchai / femenalia
Method 1 : Bracchai.
The auxilia wear the brachai.
The easiest method is to find a pair of jeans and trace around them
for the pattern. Leave enough material above the waist to fold over
for a leather thong to pass through. Brachai can be fairly loose
fitting but try to avoid them being too baggy. Brachai may extend
all the way to the ankles.
Method 1 : femenalia
femenali
have nothing to do with women, despite being worn by the legionarii,
they're to cover your femurs! A similar method to the making of
the brachai can be used, but the fitting around the legs must
be fairly tight. These should only extend to a point mid way down
the calf muscle.
Some of the legionarii prefer to wear puttees (I'm not
sure what the latin equivalent is). For these all you will require
is two rectangles of material and some twine. Wrap the rectangles
of material around the legs and fasten with twine!
Top |
| |
Helmet Liners
Rather than use the black balaclava look that proved
so popular recently this offers a more stable (less slipping on
the head) and more authentic appearance.
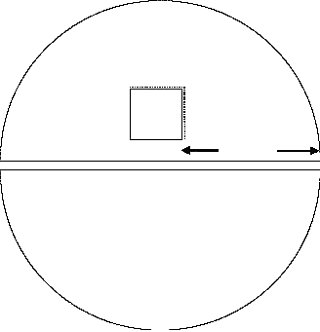
To make it you will need some cloth (a metre square
should be fine - colour is irrelevant though avoid using your old
Teletubbies pyjamas as upturned helmets may be on show to the public),
needle and thread, a smallish dining plate, a saucer and no sticky
back plastic.
Draw around the plate and then place the saucer in the centre of
the resultant circle and draw around this. Repeat for the second
piece. Having done this cut out the two large circles.
|
 |
| |
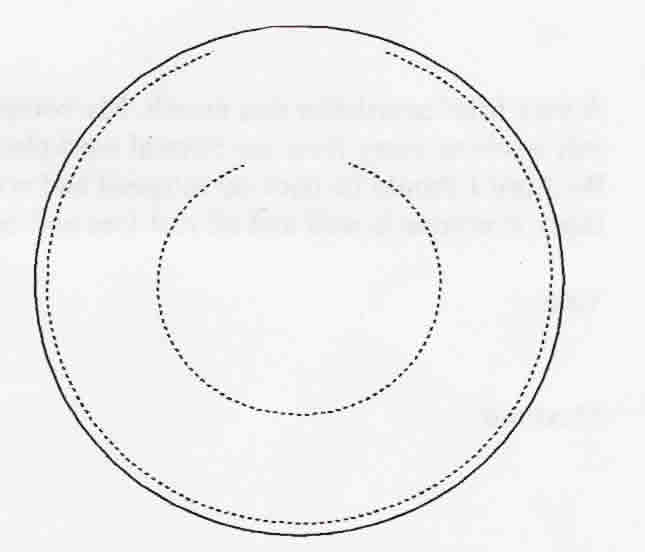
Stitch the two circles together all around
the edge and then all around the inner circle (see diag.). Leave
a small gap in each line of stitches of about 4cm.
Having done this you should fill the inner circle
with small strips of cloth to pad it. Regularly check the amount
of padding needed by placing it, in the helmet and sticking it on
your head. When it is comfortable and the helmet brow edge is at
an acceptable position over your eyebrows then stitch up the gap
in the inner circle. Then do a similar padding of the outer rim
though be careful to evenly spread the padding around the circle
and don't over fill this area. Frequent checks will help get it
right. Once comfortable stitch the gap. The liner can now be secured
in the helmet either with glue or double sided tape. You can then
make a thin roll of material which call be fixed into the inner
edge of the helmet to lie against you forehead and around the sides
and back. The result will make your head fit snugly into the helmet
without peeking out and looking rather unauthentic - very undesirable.
It should also stop the sweat dripping into our eyes so you won't
need to wear the kamikaze ninja turtle style head band.
Yes I know the Roman's didn't have double sided tape
but by using this you can always remove the liner periodically to
wash it - not a bad idea unless you want to smell as if you've bathed
in pig fat.
Adapted from the
Armae web site article
Top
|
| |
Calligae |
|
| |
|
|
| |
The most important item of kit for any infantryman has and always
will be his boots. When you join you should contact Mestrius our
resident cobbler to get a pair of Caligae made up. You will need
to draw around your feet on a piece of paper and then mark them
up L and R this should then be sent to him (Contact details will
be given to you when you join). Instructions on looking after
tne boots will be given to you when you receive them. One thing
that often confuses a tiro is how to lace them up so enclosed
are some instructions.
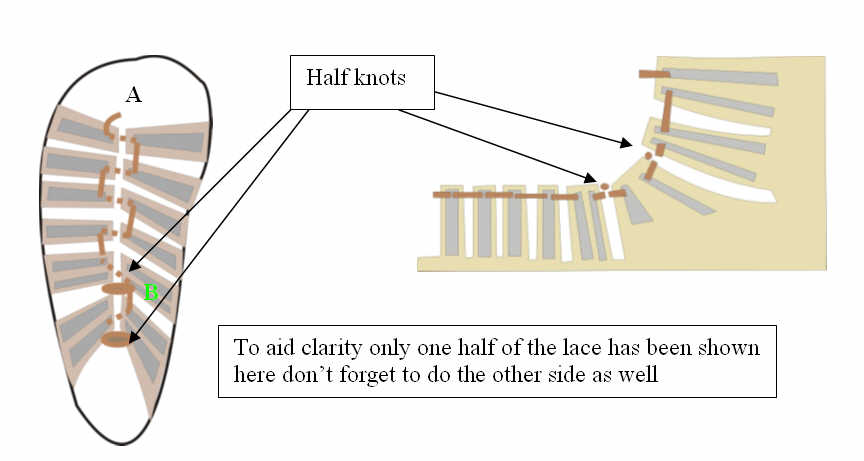
The lace should be placed so that its mid
point is in front of the first pair of boot straps A in the above
diagram. You then go from the outside through the first strap
and across to it's opposite partner. Down to the second strap,
through and across, this is repeated for each strap. When you
get to the fifth strap which has double slits instead of going
across to the front slit you go across to the second slit B
in the diagram. Some people then prefer to tie a half knot after
this double strap. You then continue this process up the remaining
straps until you get to the top of the boot finishing it off with
a bow or double knot depending on your preference, (remember though
a double knot is hard to undo when you've got cold wet fingers
and the pub is beckoning at the end of the day).
Mestrius (Dave Marsden Contact Details -
Dave
Marsden
|
|
How To
©RMRS 2008 |